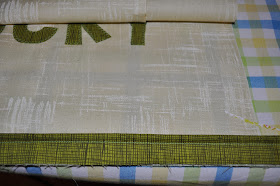
Here is a little add-on to the Applique Tutorial!
I know cording is scary.
I made a crib bumper with cording last summer and it was my first cording project.
This pillow is my second, so I am a beginner too.
Let's learn together, shall we...
St. Patrick's Day Applique Pillow With Cording
You will need:
1 Pillow Form/ or filling
About 1/2 yard fabric for the pillow cover, or enough to cover your form
Scraps for the applique
Heat N Bond
Cording-enough to go around your pillow
About 1/8 yard fabric for the cording
Thread
and a little bit of sanity ;)
I chose Heath in Green, and Painters Canvas in Cream
Okay, let's get started!
1. Figure out what you want to use for your applique and make a template.
I just used Microsoft Word to create the word "LUCKY" and then printed it the right size. Here is my first mistake....print it mirrored image if you are using words. You need them to be reversed. Since I forgot, I just turned the paper over and traced the design with a black marker so I could see it through the Heat N Bond.
Trace your design onto the Heat N Bond.
Remember, you want your design to be backwards at this point.
2. Iron your Heat N Bond with design traced on it, onto the WRONG Side of your fabric.
WRONG SIDE. Got it?

3. Cut out your design. See, this is why we needed it to be backwards, so it would be right when turned over.
3. Find the center of your fabric for the front piece of the pillow by folding it half once, and then half again and making creases along the fold. When you unfold the fabric, X will mark the spot :)
4. Peel the paper backing off your applique and iron it into position.

5. Sew all the way around your applique. I like to use a zig zag stitch, but you can do whatever stitch you would like.

Now get ready for the cording.
Don't stress....you can do this.
6. Cut the fabric you are use for the cording into 2" wide strips.
Sew them together end to end if necessary to make it long enough to go around your entire pillow.
7. Take your cording and fold your 2" strip in half around it. Get out your cording foot (Or any foot you can find that will let you sew super close to the cording) and sew a straight stitch all the way along the cording.
Leave a little bit sticking out both ends.
If you plan on stuffing your pillow, your front and back pieces should be the same size.
If you are going to make a pillow cover, yours will look like this, overlapping the back two pieces.
8. Place your pillow fabrics right sides together.

9. lay your cording you just created, with the cording towards the inside of the pillow, and between all the layers (front and back layers of the pillow)

with your cording raw edges sticking out the sides, start pinning your cording in place.
Lots of pins are the trick here.
There will be bunching of the cording in the corners, and that is A-okay!
Pin it your best, all the way around.
Dont' worry about where the two ends of cording meet, we will get there :)
Now breath, you can do this.
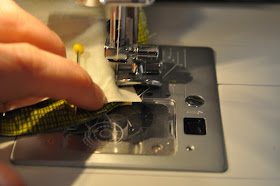
11. Place your nicely pinned pillow under the foot, and move your needle as close to the edge of the cording as you can. Sew a straight stitch all the way around the pillow.
Be sure to go slow so you can catch all the layers
-the top layer of the pillow
-the cording layer
-and the bottom layer of the pillow
It's tricky, but you can do it!
When you get to the corners, don't FREAK!
Just go slow, and bunch up the cording where needed.
Pivot with your needle in the down position to hold your fabrics in place.

You might need to remove some pins around the corners to make sure you going through all the layers.

You made it!
12. Where your two ends meet up, just overlap them and sew on.

I know it isn't the prettiest finish, but since I am new at cording too, this is the easiest way I could for see meeting the two ends. Maybe you have a better idea....go for it!
And as you can see, when I turned my pillow back inside-out, there were a few spots where I didn't get through all the layers.

Everyone makes mistakes, I just sewed those up by hand.
I still LOVE it!
If you have a better way, or tricks to cording please share!
I am always learning and would love advice.


Looks great for St.Patrick's day. Thanks for the tips.
ReplyDeleteSaint Patrick’s Day
Love it! I like the step-by-step pictures. You make cording look and feel doable. So helpful. Thanks!
ReplyDelete