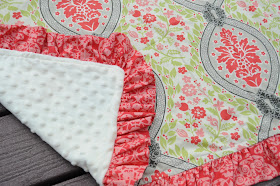
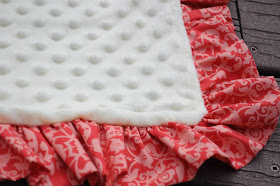
My baby girl is turning 1 tomorrow.
Can you believe it has already been a year?
Sniff sniff. I can't believe it.
She loves ANYTHING minky.
So I decided to make her another minky blanket to add to her collection of soft and fluffy snugglers
.
I will say, I think this one is the cutest ;)
I love the ruffle trim and binding. It made it that much fluffier, and I am all about the fluff!
So here is how I did it.
I started out with a
32"x40" Piece of Minky
32"x40" Piece of cotton fabric
and (7) 5"x44" strips of cotton fabric for the ruffle
1. Sew the (7) strips for the ruffle together end to end, to make one really long strip. Finish the edges with either pinking shears, a serger, or a zig zag stitch.Oooh, one really long strip!
2. Fold the strip in half, longways, wrong sides together, and press.
Now you will have one really long stripe, with right sides showing on both sides.
Next we are going to the ruffle the strip. If you have a ruffle foot, do your thing.
If you are like me and your ruffle foot gives you grief, you can ruffle the strip the old fashion way.
*I actually stitched this in sections, so it would be easier to ruffle each section separately, than to try and feed the ruffle down the entire strip.
4. Next you take one end of the threads that are hanging and pull just one of the threads while holding onto your strip with the other hand.
It will start to ruffle. Then feed that ruffle down the strip, until the entire thing is ruffly. This can take a while. Don't fret. This is why I did mine in sections.
Ruffles galore! You may need to adjust the length of your ruffles so they are long enough to go around your entire blanket.
Next....
5. Lay your minky piece and your cotton square right sides together. Make sure they are the same size and match up perfectly.
6. Now take your extremely long ruffly strip and lay it in between the two squares, all around the quilt, all 4 sides. It will be sandwiched between as we sew.
See the sandwich?
Now PIN PIN PIN! Anyone will tell you that the trick to sewing with minky is to PIN PIN PIN!!!
Pin around the entire quilt, every inch or so. Your ruffle will be inside.
7. Next we are going to sew around the entire quilt. I use a zig zag stitch for minky because it helps with stretching, but you can use whatever stitch you prefer.
8. Sew all the way around, but be sure to leave a little opening to turn the quilt ride sides out again.
9. Turn the quilt right sides out and it should look like this! So perty!
Now close up that opening, and make sure your ruffle is securely placed between the outside two layers as your sew up the hole. And then continue that straight stitch all the way around the blanket.
Here is the back of the finished product!
and the front!
Love me those fluffy ruffles.
Fluffles!
Yup, I just made up a word!
Good luck on your next project, whatever it may be!


Angie,
ReplyDeleteThis is absolutely adorable. Makes me long for another baby to sew one for. Sigh. Thanks for sharing. Love all your stuff.
xoxo
Kim
Love the fluffles, and the soon-to-be-birthday girl is too cute!
ReplyDelete♥♥♥♥♥♥
ReplyDeleteThis is precious~! Can you tell me the name of both fabrics? I love them!
ReplyDeleteThanks
Agree with Laura, please tell us about your fabrics!! This is a cute simple project, I'm new to sewing and I think with your excellent instructions I can probably pull it off. Thanks!!
ReplyDeleteHi Ladies!
ReplyDeleteHere is what i used for the main print: http://www.thelittlefabricshop.com/Products/garden-damask-in-green-tea.aspx
And I used this one for the ruffle: http://www.thelittlefabricshop.com/Products/vintage-ironwork-in-coral.aspx
Happy Sewing!
Hi, how do you finish the ruffles to connect them? Do you hem the ends and just leave them unconnected? Like the long strip? Thanks!
ReplyDeleteErika, Sorry I totally forgot to add that step! I just slipped one end into the other, folded over the showing end to make it look nice, and sewed a straight stitch down the end. I am sure there is an easy or better way to do it, but that is what worked for me!
ReplyDeleteThanks
Angie
Ok, that makes sense. Thanks!
DeleteI can't wait to make my own now!!! I love blankets and I have a soon to be 1 year old - thanks for the great instructions!
ReplyDeleteLove this blanket, but have to know where you got your fabric. I've been searching for this exact pattern, both actually, for my little girl's nursery.
ReplyDeleteMama Mia,
ReplyDeleteYou can actually find the Secret Garden Collection in our shop here: http://www.thelittlefabricshop.com/Products.aspx?Search=secret+garden
Your blanket is adorable! I used your tutorial to make my own blanket! Thanks for the tutorial! Here's mine:
ReplyDeletehttp://annaelizabethmade.blogspot.com/2013/03/ruffled-minky-baby-blanket.html
What seam allowance did you use?
ReplyDeleteExtremely cute! I am making one for my friends baby shower. Almost done, just wondering why after you flip the blanket right sides out do you sew completely around the whole thing again?
ReplyDeleteDefinitely going to try this one. Always been afraid of making something with a ruffle AND minky, but will try this!
ReplyDeleteI LOVE this! You've made it super simple with your detailed step-by-step tutorial. I've pinned this post to Pinterest! Thanks so much for sharing :)
ReplyDeleteThank you so much for the tutorial! I am doing one on my blog and linking up to this tutorial!! So cute! www.onesaturdaymorning.blogspot.com
ReplyDeleteHi thanks for the tutorial but one question how did you join the ends of the ruffle ?
ReplyDeleteThanks Tamera
Any suggestions for ruffling the strip? My stitch and string I'm pulling on keep breaking.
ReplyDeleteI made a blanket using your method last night and it came out great! I love this technique! I will definitely keep using this!
ReplyDeleteSo nice. I absolutely love this idea. Thank you so much for sharing. dressmaking fabric
ReplyDeleteWhen you pre washed the minky fabric was it really messy in the washer?
ReplyDeleteThanks for the idea! I whipped up something motivated by this over the last couple of evenings for a friend's unborn baby. I used two coordinating cotton fabrics and added a layer of flannel rather than batting. I didn't have any minky on hand, so just used some of what I had. The results are wonderful! I just know both Mom and baby will love it.
ReplyDeleteHow did you finish the ruffle binding? I know about attaching it to the blanket but I'm not sure how to finish the ruffle so it looks continuous and not split. Any help would be great. Thanks!
ReplyDeleteHow much fabric did you buy for the ruffle?
ReplyDeleteHow much fabric did you buy for the ruffle?
ReplyDeleteThe print of this baby blanket is very beautiful.
ReplyDeleteWow! What a great tips! Thank you, I was just looking for a tutorial like this! i can not wait to make it since it sound easy and simple. Thanks! baby minky blanket
ReplyDeleteWhat a gorgeous blanket! it looks so elegant and delicate. Also visit my web page : https://theminkyblanket.com/
ReplyDeleteI stumbled upon this delightful blog while searching for some frugalishness inspiration, and I couldn't help but be captivated by the charming Ruffled Minky Blanket Tutorial. As someone who firmly believes in the power of being frugalish, I couldn't resist sharing my thoughts and appreciation for this creative endeavor.
ReplyDeletefrugalishness
First and foremost, let me express my admiration for the blog author's ingenuity in finding a way to create a luxurious-looking blanket without breaking the bank. The step-by-step guide is clear, concise, and beginner-friendly, making it accessible to a wide range of DIY enthusiasts. The use of ruffles adds a touch of elegance to the blanket, giving it a high-end look without the exorbitant price tag.
ReplyDeletehttps://www.promocodehq.com/blog/
Wow, this blog is an absolute gem! The depth of research and insightful analysis really shine through. It's evident that the author has put in a lot of effort to present such well-crafted content. Kudos to them for sharing such valuable information!
ReplyDeletehoney baked ham senior discount
As an educator, I can't help but applaud the educational value this blog offers. The author's ability to teach complex concepts in a relatable manner is a gift that benefits readers from all walks of life. Learning has never been this enjoyable!
ReplyDeletehow much money do you get at the beginning of monopoly
Thank you, author, for consistently delivering high-quality content that adds value to my life. Your dedication to your readers shines through in every post, and I'm excited to see where your journey takes us next.
ReplyDeletepalmetto state armory military discount code
Your Ruffled Minky Blanket Tutorial is a fantastic DIY project, perfect for adding a touch of coziness to any home. For those in the midst of home makeovers, consider using the "15 off pottery barn moving coupon" for savings on stylish decor and furnishings. Thanks for sharing this creative tutorial and the home improvement tip!
ReplyDeleteElevate your embroidery projects with True Digitizing. Their skilled team and advanced technology ensure precise, detailed designs. Experience a seamless blend of craftsmanship and technology for exceptional embroidered creations that capture the essence of your vision.
ReplyDeleteI stumbled upon your blog while searching for the Best buffet in Karachi, and I'm delighted to find a best blog
ReplyDeleteEmbarking on an immigration journey, whether for study, work, or residence, can be a daunting task filled with complexities and uncertainties. However, with the guidance and expertise of foreign immigration consultants like IGL, navigating through the intricate pathways of immigration becomes more manageable and efficient. In this blog, we delve into the significance of IGL Foreign Immigration Consultants and how they can assist you in realizing your dreams of global mobility study abroad consultants karachi
ReplyDeleteSquare sunglasses: Square frames have a modern and edgy look, with angular lines that can complement various face shapes.
ReplyDeleteClassic rectangular frames: These frames offer a timeless and versatile look, suitable for various face shapes and styles. stylish glasses for men
Businesses can track how many coupons are used and by whom. This helps them understand their customers better and make smarter decisions about marketing. Standing Out from Competitors: Offering discounts can make a business more attractive compared to others. Customers like to get a good deal, so they might choose one business over another because of the discount.
ReplyDeletehttps://ourpostalcode.com/coupons/coupon-store/door-handle-company/
https://ourpostalcode.com/coupons/coupon-store/7dayshop/
https://ourpostalcode.com/coupons/coupon-store/jeulia/
https://ourpostalcode.com/coupons/coupon-store/academyocean-lms-ww/
https://ourpostalcode.com/coupons/coupon-store/dead-good-undies/
Awesome online digitizer Article
ReplyDelete