
 I am so excited to share with you all my ABSOLUTE FAVORITE handmade baby gift!
Easy Baby Bib and Burp Cloths


I love making these up for friends and family who are expecting a new little bundle.
Making these are super easy, choosing the fabric for these......now that's the hard part!
We use them every.single.day at our house!

Want to make some of your own?
Keep reading for the step-by-step tutorial with pictures!
Here is the tutorial, and I have included a bib template!
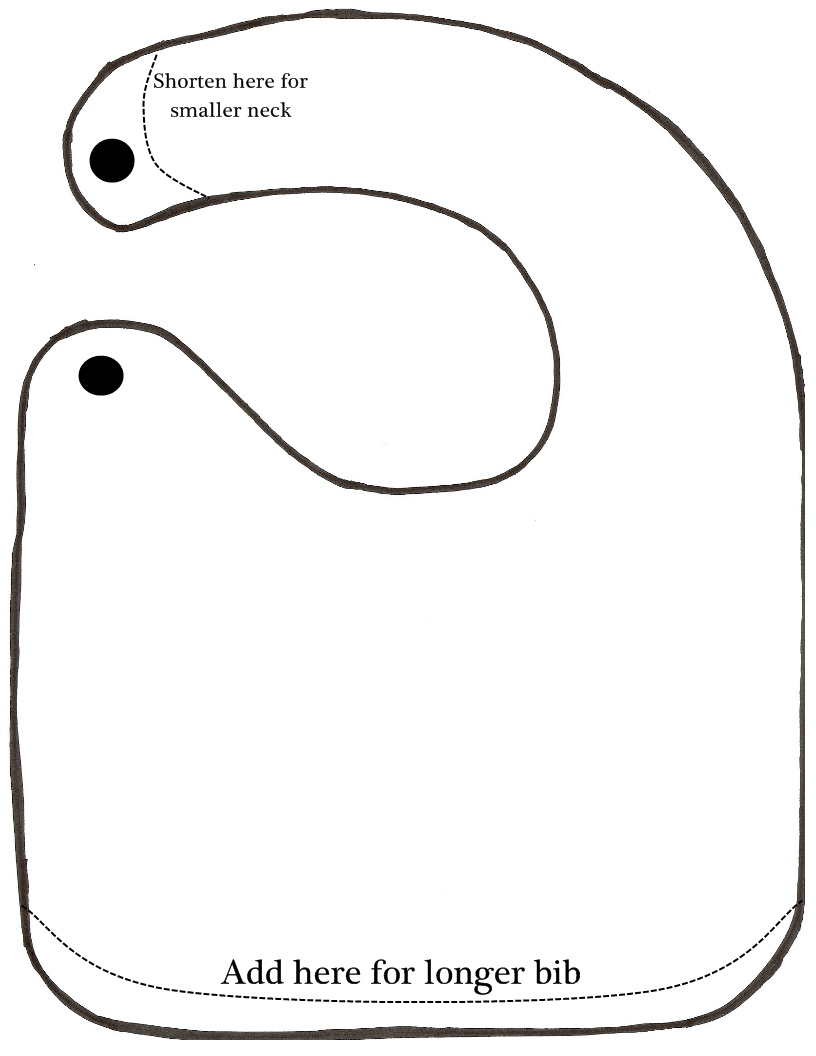
For my template, I simply traced one of my favorite style bibs, and then added about 1/4" around the whole thing for seam allowance. So feel free to measure your own bibs, or just right-click and save this template picture and then print it out on cardstock.
*I also lengthened my bib about 1.5" longer than the template. I like em long!*
Got your template? Good. Let's sew!
1. Once you have chosen your fabric, turn it onto the wrong side. Lay your template down, and take note of what side you want the snap to be on. I like mine to snap on the right side, so I lay my template down backwards. Trace around the template and cut it out.


2. Backing. I like to use Cotton Chenille for my backs. But you can really use anything, fleece, flannel, minkie, whatever! Just make sure when you trace your template onto your backing, TURN THE TEMPLATE OPPOSITE OF HOW LAID IT OUT ON THE FRONT FABRIC. So when you put them together in the end, both right-sides will be facing out! Don't even ask how many times I have made THAT mistake :)


Start sewing where the opening is, and sew all the way around the bib. This step will seal off the opening you left, so make sure everything is just how to want it to look.

8. Now all you need to do is add your closure. I love to use snaps, because they are lot sturdier than velcro. You can find snaps in almost every big chain fabric store, and they come with instructions on how to install them. Or you can use velcro. It's your bib, do as you please!
If you used a fluffy fabric for the back, they might need a little lint roller to finish them off!
Sew Cute!
You're Done!
Wrap that baby up for a friend, or go ahead and throw it on your rascaliest child to keep them clean!
I make no guarantees that it will keep them out of trouble though....

BURP CLOTH TUTORIAL
For the burp clothes, follow the same directions.

1. Place the two pieces right sides together and sew all the way around leaving an opening at the bottom.
2. Turn right sides out and iron flat. Fold under the opening pieces and iron them into place too.
3. Sew a zig zag stitch all the way around the cloth, sealing off the opening.
DONE!
Don't be afraid to experiment around and make a blanket or two as well!

I made one like this last year for a friend and it had a pink chenille back.
One of my favorites!

How did your's turn out?
I would love to know!
Happy Sewing All!
23 comments:
What a GREAT idea! I love using the chenille.
Can you please tell me the measurement of your final bib? I enlarged the template, but my bib turned out pretty small.
Also what is the setting for your zigzag stitch? I like the looks of yours.
Thanks again for a great tutorial!
Great tutorial! I'm hoping to make a few bibs tonight (well, sometime this week anyways) for my sister's second child. Bibs can get some hard wear on them, and a few new cute ones for the new baby I'm sure will be appreciated.
What are the measurements of the blankets?
If you stack both pieces of fabric(face to face), you will only have to cut once. And be ready to sew quicker!(plus you will never have one piece the wrong way!) Got material today, hope to sew up a 1/2 dozen bibs and burp clothes for my niece's new baby tomorrow!
Baby Bibs protect from geeting wet and keeps baby clean and neat while feeding.
Where do you buy the Chenille fabric. I haven't been able to find it at joanns or hobby lobby and I'm afraid of ordering the wrong type online. I want to make some of these for my little baby girl :)
I buy my chenille at fabric.com. not cheap, but a yard goes a long way. they sell by 1/2 yd also. it's great. 10.5 ounce 100% cotton.
Thank you for sharing this with us! The tutorial was great and the bib was perfectly done. And your little model is so adorable.
Great bib tutorial. Really easy and simple to follow. I suggest that you make the closure adjustable. Babies tend to grow fast that sometimes the bib wouldn't fit them like they do before.
http://ghcbibs.com
Love it, thanks for sharing, my sister will really love this for her newly born daughter, I'll look forward on making some.
Buy Haberdashery Online
Great tutorial! I'm hoping to style a few bibs. Bibs can get some hard ware on them, and a few new cute ones for the new baby.
http://weeclothes.com
I recently started to crochet and I started making baby bibs but would like to put a backing on them but I'm not sure what to use do you have any suggestions?
I recently started to crochet and I started making baby bibs but would like to put a backing on them but I'm not sure what to use do you have any suggestions?
I recently started to crochet and I started making baby bibs but would like to put a backing on them but I'm not sure what to use do you have any suggestions?
I recently started to crochet and I started making baby bibs but would like to put a backing on them but I'm not sure what to use do you have any suggestions?
I love how this bib snaps on the side instead of the back! Makes it just a little easier to put on when baby is in the high chair!
Blessings,
Neesie
Thank you for sharing this with us! The tutorial was great and the bib was perfectly done. And your little model is so adorable
Baby Bibs
Thank you for posting such a great article! I found your website perfect for my needs. It contains wonderful and helpful posts. Keep up the good work
Infant bibs
What do you do if your home doesn't have enough storerooms or you have more established kids possessing those wardrobes, or you basically don't have a craving for utilizing those wardrobes as a storage space? 24 hour toronto coin laundromat services
that was a great tutorial. i can't wait to see another good share from you. if you interested to earn money online, dont hestitate to open this link.
It was really insightful.
Thanks for such a nice content.
Cheers
BTW if anyone interested more have a look Click here thanks
I recently started to crochet and I started making baby bibs but would like to put a backing on them.
Another resource: Laundry in Dwarka
Fantastic ideas Vector Drawing
Post a Comment